Tower of Gand Classes — Full List, Tier Rankings & Recommended Builds
Tower of Gand features over 20 unique base classes, each with distinct growth paths, skills, and playstyles that dramatically shape how you survive the tower's permadeath dungeon runs. Since your class is randomly assigned at the start of each run, mastering every class is essential to consistent progression.
How the Class System Works
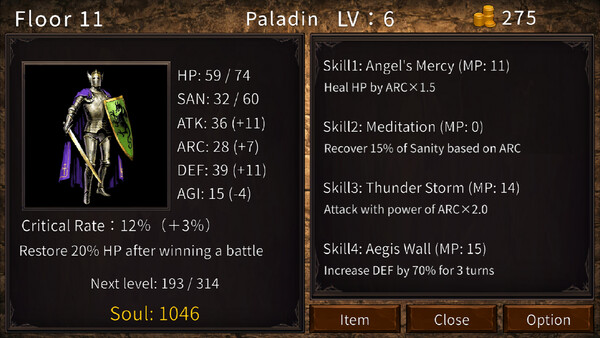
Unlike most RPGs where you pick your class at character creation, Tower of Gand randomly assigns your class at the start of every run. This roguelike twist means you cannot rely on a single favorite — you need working knowledge of every class to survive. Each class comes with a unique set of skills, a distinct growth path, and its own strengths and weaknesses in the tower's turn-based combat system.
Every class interacts with the game's five core combat actions — Attack, Skill, Defend, Talk, and Escape — in different ways. Some classes excel at raw offense through powerful Attack and Skill options, while others may lean on Defend to outlast dangerous encounters or even use Talk to avoid combat entirely. Understanding which actions your assigned class handles well is the first step toward a successful run.
Growth paths further differentiate the classes. As you ascend the tower and gain experience, each class branches into specialized roles. Choosing the right growth direction for your current run — based on the enemies, events, and resources you encounter — is a core strategic decision that separates deep runs from early deaths.
Class Archetypes and Roles
While each of Tower of Gand's classes is unique, they broadly fall into several archetypes. Offensive classes prioritize high damage through Attack and Skill actions, aiming to eliminate threats before they can deal lethal damage. Defensive classes rely on the Defend action and damage mitigation skills to sustain through prolonged encounters, trading speed for survivability. Utility and hybrid classes often have access to the Talk action's most powerful effects, enabling them to negotiate with enemies, conserve resources, or trigger special event outcomes that other classes cannot.
Gold management also varies by class. The tower's economy revolves around gold — it can buy survival through shops and events, but poor spending decisions lead to ruin. Some classes are more gold-efficient than others, requiring less equipment investment to function, while certain classes depend heavily on purchased gear or consumables to compensate for innate weaknesses. Knowing your class's gold dependency helps you make smarter decisions when revealing panels on the 5×5 dungeon grid.
Sanity interacts with classes in meaningful ways as well. Since sanity constantly drains inside the tower and reaching zero triggers madness and inevitable death, classes that can resolve encounters quickly or avoid unnecessary fights have a natural advantage. Slower, more defensive classes may need to prioritize sanity-restoring events and items to avoid the madness spiral on deeper floors.
General Tier Considerations
Tier rankings in Tower of Gand are more fluid than in traditional RPGs because the randomized nature of each run — different enemies, events, and panel layouts — means that a class performing well in one run may struggle in the next. A class that dominates when shops appear early can falter when gold is scarce. Similarly, classes that rely on specific skill synergies shine when their growth path aligns with the encounters on a given floor but may underperform otherwise.
That said, classes with versatile combat options across multiple actions (Attack, Skill, Defend) tend to perform more consistently. Classes that can handle both single-target threats and dangerous multi-enemy encounters without heavy resource investment are generally considered stronger picks when the randomizer favors you with them. Conversely, highly specialized classes — those that excel in one narrow scenario but crumble outside it — tend to be more inconsistent across runs.
As the community continues to explore the tower's depths, tier rankings will evolve. Early consensus suggests that adaptability and sanity efficiency matter more than raw damage output, since surviving long enough to reach deeper floors is the primary challenge. Classes that can leverage the Talk and Escape actions effectively to avoid unfavorable fights preserve both HP and sanity for the encounters that truly matter.
Build Strategy and Growth Path Tips
When assigned a class at the start of a run, assess its core strengths immediately and plan your exploration of the 5×5 grid accordingly. Offensive classes should push aggressively to gain experience and gold from combat before sanity becomes critical. Defensive classes can afford to explore more thoroughly, revealing additional panels to find shops, rest points, and sanity-restoring events. Utility classes should prioritize Talk-based encounters and special events where their unique abilities unlock outcomes other classes cannot access.
Growth path decisions should respond to what the run gives you, not follow a rigid pre-planned route. If your first few floors provide strong offensive gear, leaning into a damage-focused growth path makes sense even on a class that might typically favor defense. The roguelike nature of Tower of Gand rewards players who read the current run's circumstances and adapt their build on the fly rather than forcing a fixed strategy.
Finally, never underestimate the Escape action. In a permadeath game, retreating from a fight you cannot win is always better than dying. Certain classes have enhanced Escape capabilities that make tactical retreats more reliable. Learning when to fight and when to flee — and which classes can do each effectively — is one of the most important skills for conquering the Tower of Gand.